Vibe Coding Fundamentals In 33 minutes
Description
Head to http://brilliant.org/TinaHuang/ to get started for free with Brilliant's interactive lessons with 20% off an annual membership.
Want to get ahead in your career using AI? Join the waitlist for my AI Agent Bootcamp: https://www.lonelyoctopus.com/ai-agent-bootcamp/
🤝 Business Inquiries: https://tally.so/r/mRDV99
🖱️Links mentioned in video
Sample PRD: https://docs.google.com/document/d/1cAq3qjgfTISPHP4p_LQALMotCNqh6Y1SBl2GzmD9OmE/edit?usp=sharing
🔗Affiliates
My SQL for data science interviews course (10 full interviews):
https://365datascience.com/learn-sql-for-data-science-interviews/
365 Data Science:
https://365datascience.pxf.io/WD0za3 (link for 57% discount for their complete data science training)
Check out StrataScratch for data science interview prep:
https://stratascratch.com/?via=tina
🎥 My filming setup
📷 camera: https://amzn.to/3LHbi7N
🎤 mic: https://amzn.to/3LqoFJb
🔭 tripod: https://amzn.to/3DkjGHe
💡 lights: https://amzn.to/3LmOhqk
📲Socials
instagram: https://www.instagram.com/hellotinah/
linkedin: https://www.linkedin.com/in/tinaw-h/
discord: https://discord.gg/5mMAtprshX
🎥Other videos you might be interested in
How I consistently study with a full time job:
https://www.youtube.com/watch?v=INymz5VwLmk
How I would learn to code (if I could start over):
https://www.youtube.com/watch?v=MHPGeQD8TvI&t=84s
🐈⬛🐈⬛About me
Hi, my name is Tina and I'm an ex-Meta data scientist turned internet person!
📧Contact
youtube: youtube comments are by far the best way to get a response from me!
linkedin: https://www.linkedin.com/in/tinaw-h/
email for business inquiries only: [email protected]
Some links are affiliate links and I may receive a small portion of sales price at no cost to you. I really appreciate your support in helping improve this channel! :)
My Notes
00:00 — Intro
- 00:17 Vibe coding is described as a game-changer that fundamentally changes how apps are developed.
- 01:14 Definition of Vibe coding: Coined by Andre Kaparthy on Feb 3, 2025, it's a new kind of coding where you "fully give into the vibes," embrace exponentials, and forget the code exists.
- 01:37 Made possible because LLMs (e.g., Cursor Composer with Sonnet) are getting very good.
- 01:40 You basically tell the LLM what you want, and it builds it. Some people just speak to it.
- 02:16 Vibe coding isn't "black magic"; principles and order exist in how you prompt the AI.
02:30 — Vibe coding fundamentals
- 02:30 Based on the Vibe Coding 101 with Replet course.
- 02:44 Five fundamental skills in vibe coding:
- Thinking (Thoroughly define what you want)
- Frameworks (Know and specify the right tools)
- Checkpoints (Save your progress)
- Debugging (Fix errors methodically)
- Context (Provide detailed information to the AI)
02:50 Thinking (Thoroughly define what you want)
- 02:51 Need to thoroughly think through what you want to build and communicate it to the AI.
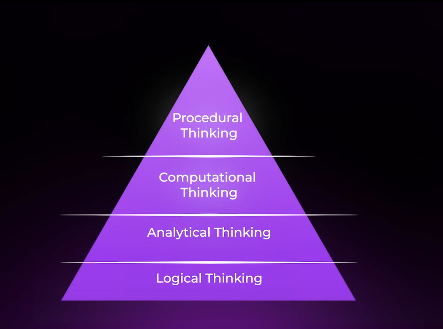
- 02:57 Four levels of thinking when defining a project:
- 03:07 Logical thinking: What is the game/app? (e.g., Chess)
- 03:10 Analytical thinking: How do I play this game/use this app? What is the main objective?
- 03:17 Computational thinking: How to fit the logic into problems/configurations? How to enforce rules?
- 03:28 Procedural thinking: How do I excel in this game/make this app the best? What strategies/boundaries? - 03:46 Translate natural language thought into communication for the AI.
- 03:59 Most vibe coders have opportunity for improvement here; don't fully think through the desired final product.
- 04:13 If you don't know exactly what you want, how can the AI?
15:01 Context (Provide detailed information)
- 15:04 General rule: The more context (information, detail) you provide the AI/LLM, the better the results.
- 15:15 Context forms: Detailed original prompt/PRD, mockups, examples, extra data, details about app/environment/preferences, errors (full message, screenshot).
- 15:42 Mnemonic for principles: FCDC² - Frameworks, Checkpoints, Debugging, Context, Thinking (Friendly Cat Dances Constantly Thinking).
04:20 — Example PRD
- 04:21 The best way to apply the four levels of thinking and communicate clearly to the AI is to create a Product Requirements Document (PRD).
- 04:31 Example PRD for an AI-powered personalized nutrition plan for diabetes.
- 04:38 Logical Thinking: Covered in the Project Overview section (Goal: develop an AI system for personalized nutrition plans).
- 04:56 Analytical Thinking: Covered in the Skills section (List necessary tech/skills like Python, healthcare data processing, OpenAI API, etc.). Can be more specific (packages, front-end, back-end).
- 05:24 Computational Thinking: Expressed through the Key Features section (Defining what should appear in the application, e.g., Milestones with specific metrics).
- 06:01 Procedural Thinking: Exemplified by adding as much detail as possible throughout the PRD (Defining specific factors, contextual customization types, target audience experience). - 06:26 The more detail in the PRD, the clearer the vision, and the better results from the AI.
- 06:44 You can use AI (like ChatGPT) to help generate a PRD using a specific prompt.
- 06:59 Spend significant time on the PRD; it's easier to have a clear vision upfront than fix later.
Example PRD Prompt
Help me make a PRD for an MVP app I'm looking to vibe code.
I'm looking for a gamified,
pixel-art app where users set daily goals
and earn XP for completing them.
If they slack, their AI rival gains XP, inspired by pixel
art games like Red from Pokemon.
User should be able to choose to customize
the AI rival and tasks that user
would do like studying calculus for 50 min,
drink 8 glasses of water, gym for 1hr.
Help me think through the rest of the app. For example what are
the game mechanics since we will be
earning XP but when we don't check off items
rival will be earning XP continuously too
such that by the end of the day rival would have gained more XP.
This will be motivating since we can see
real time XP increase for rival. We should think through
the following questions:
What is the game?
How do I play the game?
What are the patterns behind the game?
How do I excel at the game?
I've also attached an example PRD that is well fleshed out as guidance.
And then put text: "EXAMPLE PRD LINKED IN DESCRIPTION"
07:08 — Frameworks
- 07:10 Second principle of vibe coding: Know your frameworks.
- 07:14 Chances are, someone has built something similar; AI is trained on existing solutions.
- 07:24 Directing the AI towards the correct framework yields much better results than asking it to start from scratch.
- 07:35 Easiest way: List the specific frameworks or packages you want the AI to use (e.g., React backend, CSS/HTML/JS frontend, Tailwind CSS, 3.js for animations).
- 08:05 If you don't know the best framework, ask the AI for recommendations first, then ask it to implement using the chosen one.
- 08:25 Key takeaway: Be open to learning about different frameworks and how components fit together.
- 08:32 You don't need to know how to implement everything yourself, but understanding the high-level structure of what you're building is important (e.g., front-end, back-end, how they communicate).
- [08:56](https://www.youtube.com/watch? مزاج_youtube.com/watch?v=iLCDSY2XX7E&list=PLVD3APpfd1ts0x9qpHagm5Nyd2GKxwrly&index=2&t=536s) Think of it as building, developing, and learning with the AI simultaneously.
09:34 — Using Github for version control
- 09:04 Third principle: Always have checkpoints and version control.
- 09:07 Things will break. You don't want to lose work.
- 09:35 General best practice: Learn how to use Git and GitHub.
- 09:54 Git: The version control software.
- 09:57 GitHub: A website to store code (repositories) on the cloud, for saving and sharing.
10:06 Basic Git Workflow:
- 10:07 Install Git: Download or use terminal/command line. Can ask AI code editor to do it.
- 10:21 Initialize Git in project folder:
git init - 10:36 Check status of files (shows untracked files):
git status - 10:40 Start tracking files:
git add [filename]orgit add .(track everything) - 10:54 Save a specific version/commit changes:
git commit -m "Your message here"(e.g.,git commit -m "Initial commit") - 11:21 View commit history:
git log - 11:24 Roll back a commit:
git reset
11:29 Linking to GitHub:
- 11:30 Create a new repository on github.com.
- 11:34 Copy the remote URL.
- 11:37 Link local repo to GitHub:
git remote add origin [remote URL] - 11:44 Rename main branch (optional but common):
git branch -M main - 11:53 Push local commits to GitHub:
git push -u origin main - 12:20 With an AI code editor, you can often use natural language commands instead of exact Git commands (e.g., "use git to commit these changes, push it to GitHub").
- 12:36 Key to vibe coding: Understand the high-level structures and flows so you can direct the AI in the implementation. AI excels at implementation.
12:50 — Debugging your vibe code
- 12:50 Fourth important skill: Debugging.
- 12:53 Whatever you build is going to go wrong. Debugging is as important as building.
- 13:16 Best debugging is methodical and thorough:
1. 13:20 Identify where the problem is and what it is.
2. 13:24 Apply different solutions to fix it. - 13:34 With vibe coding, often the best way is to point out the error to the AI and let it come up with solutions.
- 13:47 Example: Copy/paste error message to the AI. It will propose fixes.
- 13:56 Accept changes; might take multiple cycles. Be patient.
- 14:08 Having a basic understanding of what you're building (e.g., file structures) is helpful if the AI struggles to fix it easily. You can point out the likely source of the problem.
- 14:28 Example: Pointing out an overlapping UI component and guiding the AI to make dimensions dynamic rather than static.
15:51 — Quiz 1
- 15:56 Assessment questions on the vibe coding fundamentals covered so far.
16:04 — Replit vibe coding demo
- 16:07 Replet: A platform for vibe coding and deploying apps quickly on the cloud. Beginner-friendly.
- 16:16 Start by using ChatGPT to generate a PRD based on a prompt, defining the app's requirements and features.
- 16:49 Example app: SEO metatag visual inspector.
- 17:18 Key features identified in generated PRD: Input URL field, HTML fetching/parsing, SEO tag extraction, visual feedback previews, total score out of 100.
- 17:43 Recommended to start with only key features (MVP) and add on later.
- 18:08 Ask ChatGPT to turn the PRD into a prompt for Replet and generate an image mockup.
- 18:27 In Replet, copy/paste the prompt and link the image inspo, then click "start building".
- 18:39 App is named SEO Tag Scout. Can decline additional features initially.
- 18:48 Replet generates visuals and populates files.
- 18:55 Replet has built-in version control (can roll back), but learning Git is still best practice.
- 19:11 Tip: Use the assistant to explain the project's file structure to learn the frameworks/components being used.
- 20:01 Optional: Right-click on code files and ask the assistant to explain them.
- 20:15 Test the app: Input a URL.
- 20:24 Encountered an error. Debugging step: Tell the AI "there is an error" and let it attempt to fix it.
- 20:37 Test again after fix: App shows title, meta description, Google/social media previews, raw data. Verified the score changes for different websites.
- 21:12 Refinement: Ask AI to improve visuals ("Make it colorful") and presentation of data (explicitly show title, etc.).
- 21:33 Tip: Make changes/point out issues one at a time rather than a laundry list to avoid confusing the AI.
- 21:44 Replet automatically improved the UI (icons) during the process.
- 21:57 Replet provides a dev URL and QR code to easily view the app on other devices (e.g., mobile) for testing responsiveness.
- 22:24 Can deploy the app from Replet once done.
- 22:28 For more complex/scalable projects, might want to migrate to an AI code editor like Windsurf/Cursor.
22:40 — Comparing vibe coding tools
- 22:41 Principles of vibe coding are the same regardless of the tool.
- 22:49 After beginner stages, most users switch to AI code editors (Cursor/Windsurf) for more robustness, functionalities, and scalability.
- 23:00 Replet Pros: Faster, easy to use, cloud-based (no environment setup, easier deployment).
- 23:08 Cursor/Windsurf Pros: More functionalities, built for full-scale development, allows tweaking/fine-tuning.
- 23:23 Cursor/Windsurf Cons: Higher learning curve, need to set up/debug local environments, need to handle deployment/monitoring.
23:35 — Windsurf vibe coding demo
- 23:36 Demo using the Windsurf environment (an AI code editor).
- 23:38 Uses Cascade to type prompts. Example uses Claude 3.7 Sonnet model.
- 23:47 Input the same PRD prompt and image inspo as in the Replet demo.
- 23:53 This is a local development environment, so it sets up things locally.
- 24:05 User is prompted to accept terminal commands (can auto-run, but manual acceptance is safer for local environments).
- 24:27 Takes longer initially due to environment setup and package installation.
- 24:37 App is ready; requested to open the browser preview.
- 24:54 Initial build looks much better and very similar to the provided image inspo compared to Replet's first version.
- 25:29 Tested with different websites; SEO scores vary, noted difference compared to Replet.
- 25:55 Refinement: Ask the AI to make the URL input more flexible (not require
https://) and enable copy/paste. - 26:18 Initial fix attempt didn't work ("still doesn't work"). Second attempt succeeded.
- 26:31 Can continue refining (centering, colors, etc.).
- 26:42 With Windsurf, it's important to use Git and GitHub for version control.
- 26:46 Can prompt the AI: "initiate git for version control".
- 26:56 AI prompts to confirm
git addandgit commit. Accept changes. - 27:10 Progress is now tracked; can
git pushto GitHub.
27:22 — Quiz 2
- 27:22 Assessment questions.
27:25 — Tips & best practices
- 27:44 Mindset: Start small and work your way up. Focus on the Minimal Viable Product (MVP).
- 27:49 Identify the minimum features for the app to function.
- 27:56 Get the basic thing working first, then iterate and add features. Avoid trying to build everything perfectly at once. - 28:25 Framework: Two main modes when vibe coding:
1. 28:34 Implementing a new feature: Provide relevant context (frameworks, docs, details), make incremental changes, use checkpoints/version control.
2. 28:51 Debugging errors: Figure out how things work (understand project structure, ask AI), figure out how to give information to the LLM to get unstuck (provide context: screenshots, error messages, point to files). - 29:35 Advanced Tip: Write rules or documentation (like a system prompt) for your coding agent.
- 29:42 List things you want it to do or not do.
- 29:46 Examples of rules:
- 29:49 Limit code changes to the minimum when implementing/fixing. (Prevents unnecessary changes breaking other things).
- 30:03 Rate limit all API endpoints (Avoids high costs).
- 30:11 Enable captcha on auth/signup pages (Security).
- 30:18 Can find rule examples online specific to app types or languages.
- 30:27 Provide this rule file to tools like Replet or Cursor/Windsurf.
- 30:36 Especially for those without engineering backgrounds, learn about rules for safety/security (e.g., not exposing API keys) and put them in your rule file.
31:40 — Quiz 3
- 31:41 Final assessment questions.